
Challenge 07 - Exploring Inkscape
2014-05-09 00:00:00This post is part of a series of tutorials that explain how I do permaculture design using free software and readily available tools. The remainder of the series is here: Installing software, getting background imagery, contours part one, contours part two (google maps), contours part three (DIY surveying), making mosaics.
We've covered what I think are the hardest parts of using software for permaculture design for most folks (namely, terrain/contours). Now that you're over the hump, it's time to start having some fun, so we're going to play around and see how to do a bunch of the most common permaculture design features using inkscape. We'll also see what the real advantage of computer design is - it's not in the drawing, it's in the editing. Drawing with a computer is about the same speed as drawing by hand, up until you need to change something. At that point, the computer is vastly better, so we'll play around with the kinds of things we can easily change as well.
Drawing stuff in inkscape
We're finally into the real meat of the tools tutorials. Today we're going to
cover the pen tool  , the pencil
tool
, the pencil
tool  , and a little bit of
color selection. Next time we'll cover shapes and paths, and then we'll go on to
boolean operations (cutting objects into pieces using other objects, basically).
, and a little bit of
color selection. Next time we'll cover shapes and paths, and then we'll go on to
boolean operations (cutting objects into pieces using other objects, basically).
The pen and pencil are the two tools I use more than anything else in inkscape. With these two, you can draw straight lines, smooth curves, or freehand sketches.
The Pen Tool
The pen tool in inkscape lets you draw bezier curves and straight lines. Bezier
curves allow you to connect "control points" (the points where you click when
you're drawing) with smooth curves. Once the curves are established, you have
the ability to move the control points around and also use the curve handles to
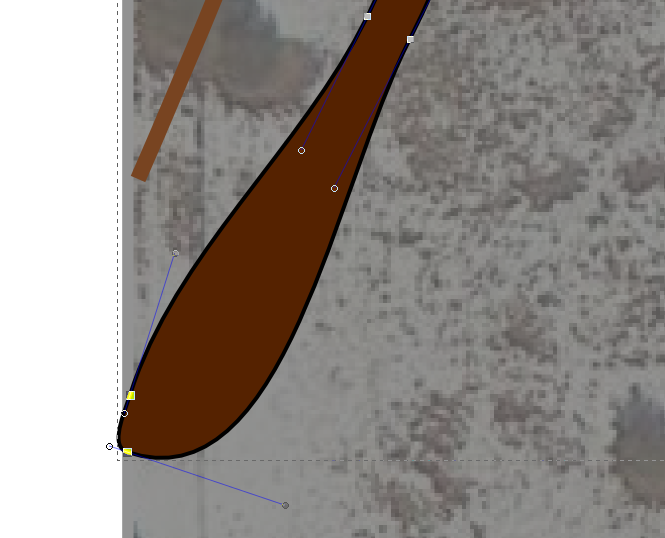
change the direction of the curve at each control point. This image shows what's
possible:
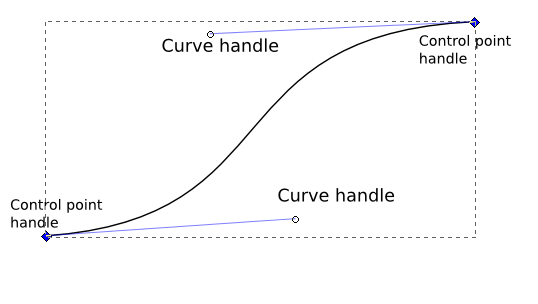
If you're drawing a bezier curve with the pen tool and you work your way back around to the point you started the curve with, inkscape will close the curve into a filled shape for you. You can then give it a fill color and a few other handy tricks that I'll show in a minute.
I use these things all the time when I'm designing, but they're particularly awesome for drawing earthworks and related things.
Drawing a swale and pond combination with the pen tool
There are two ways I draw a swale, depending on the style of design I'm doing. If it's a large site with lots of swales, I'll set the thickness of the line to be approximately right to indicate the swale, and just draw along the contour until I have what I want. If I want to get more detail, or if the swale is going to have varying thickness, I'll use a different approach where I draw an outline of it and fill it. That gives me maximum flexibility on the shape of the swale, but comes at the cost of taking longer to draw.
First things fist though, let's get our layers set up:
Setting up your layers
The most crucial tool to make your life better in inkscape is mastering the use of layers. My rule of thumb is: If in doubt, add a layer. You can always move the objects around between layers, and having the ability to turn stuff on and off and lock it at will is really nice.
- Open the Layers dialog (ctrl + shift + L)
- Click the '+' and enter "Swales" for the name, then hit enter
- Click the swales layer to make it active
- For each other layer in your drawing, click the padlock icon next to it to lock all other layers in your drawing. This will make it much easier to work on the swales without messing anything else up. Note that a layer is locked when the padlock is closed, and unlocked when it's open.
Drawing a fixed-thickness swale
- Select the pen tool (shift+F6 or click )
- Click along your contour where you want the swale to be. We'll make the line smooth later, but for now try to put extra clicks in spots where there are sharp turns, and space them farther apart where the contour is relatively straight. When you get to the end, either double click the last point or press Enter to end the line.
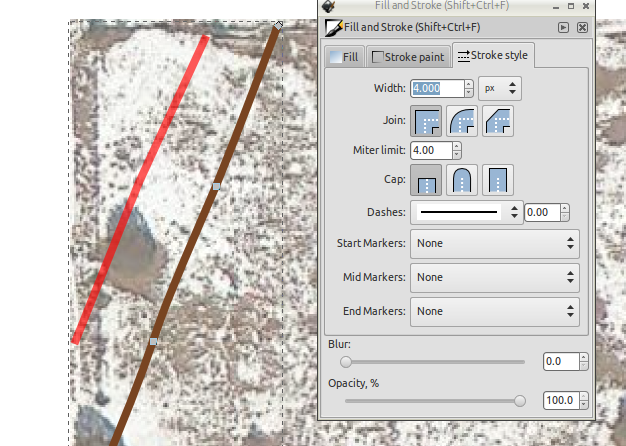
- Open the fill and stroke dialog (ctrl + shift + F), and navigate to the Stroke Style tab (far right tab on the top of the dialog)
- At the top of the tab pane, there's a box labeled "Width:" - bump that number
up to about 4 pixels (you can change it later). That will make your line thicker
so it looks like it takes up some space. You can play with this number so that
it approximately matches the size of the swale you're putting in.
- Back in the drawing window now, press n to enter node editing mode.
- Make sure your new swale is still selected, then press ctrl+a to select all of its nodes.
- Press shift+S to smooth them. This converts the nodes from sharp corners to rounded, but without moving your points from before.
- You can now use the little handles all over the curve to make adjustments.
Drawing a more detailed swale
If you want to be able to vary the thickness of your swale mound in the drawing, you can draw it by outlining instead of using the stroke width. This can be handy in cases where your swale crosses slopes of different steepness, because it'll be broad on the shallow slopes and narrow on the steep sections.
- Select the pen tool
-
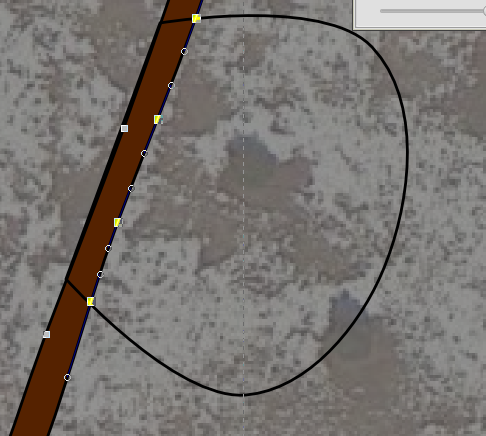
Click along your contour as before, where you want the swale to be. This time though, don't end the line at the end of the swale. Double back on what you just drew, drawing points at the same spots but spaced a bit apart to give the swale some width. You can vary the width now, or later when you adjust the points. In the image below, it's hard to see, but there's a light green line that shows the swale as I'm drawing it. The red bit at the end is the part that isn't drawn yet. The thick red line is part of a contour from the base map, not part of the swale.
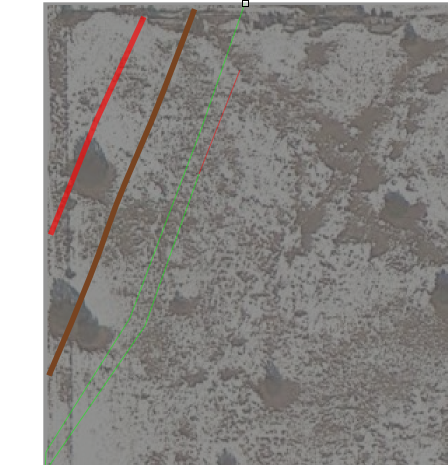
-
When you get back up to where you started, click your last point right on top of the first point you added (there will be a little box there). This will close the shape so that it can be filled.
-
You can now click one of the colors on the bar of colored boxes at the bottom of the screen to set the fill color. This will fill the swale with that color. You can also set the stroke color by pressing shift while you click the colored square. The stroke color is the outline, and the fill color is what's inside.
-
Now you can smooth it again as before, but we'll avoid selecting the nodes on the end (that way your end points remain sharp).
- Press n to enter node edit mode
- Select the interior nodes. You can do this either by pressing ctrl + a
as before, then manually unselecting the ends by holding shift and
clicking them, or you can just rectangle select them by dragging a box
around them that doesn't include the ends.
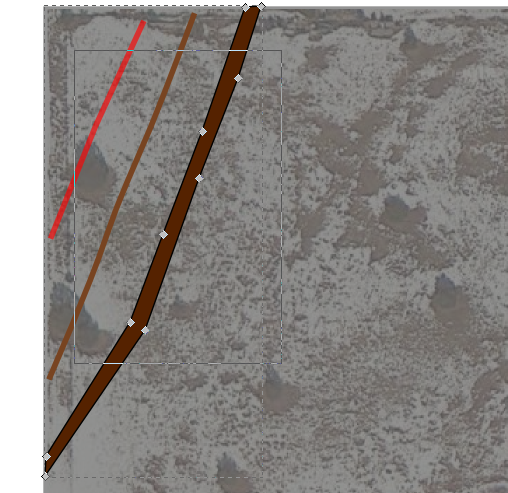
- Press shift+S to smooth the nodes. If you had the ends selected, you'll
get a funny looking situation on the end nodes that looks like this:
- If the ends were smoothed, you can either undo the last operation by
pressing ctrl+z, or you can pick the nodes that you want to be sharp again
and push the Make selected nodes corner button
 .
You have to press it twice to get the smoothing to go away.
.
You have to press it twice to get the smoothing to go away.
Adding a pond to the swale
Adding a pond to a swale is super easy - basically, you just either widen the swale if it's the outline kind, or you bend it around the dam of the pond if it's the stroke thickness kind. We'll draw one of each:
First, our layers again!
- Add a new layer above the "swales" layer called "ponds" and make it active (follow the instructions above for adding the swales layer if you need a refresher).
Adding a pond to a "thickness" swale
The first swale I drew was of the stroke thickness variety, so we'll add to that one first.
- Select the pen tool
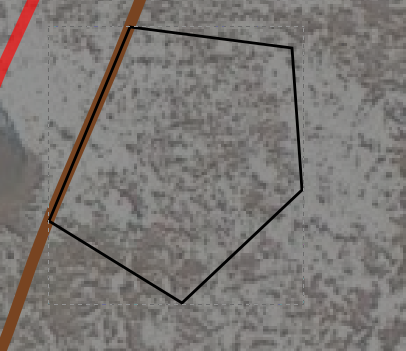
-
Draw the outline of your pond. Remember that the uphill shore of the pond will follow the current swale contour exactly (water is perfectly level). The dam will form a loop with the contour so that you end up with a bowl for the water to sit in. For a contour/ridge/etc. dam, most of the pond shore will be dam, and will bulge out from the swale contour on the downhill side. For a valley dam, most of the shore will be on the swale contour, and the dam will just cross the valley more or less in a straight line.
-
Switch to node mode (press n) and select the parts of the pond outline that should be smooth curves. In my case, it's the shore on the downhill side of the swale - I don't want the two points on the swale to be smoothed because that would make them bulge out unrealistically.
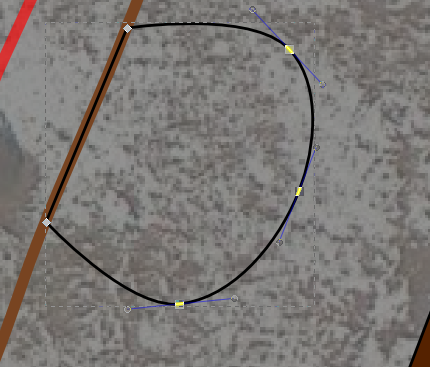
-
Set the fill color for the pond (I typically use bright blue so it's easy to tell where the water is).
-
Draw the dam around the pond. For a thickness swale, I'll add some extra nodes to it and just bend it around the pond:
- With the node tool still selected, pick the swale.
- Double click the swale at the corners of the pond, and somewhere in the middle. Each time you double click, you'll add a new point on the swale
- Drag the new middle points out around the border of the pond to signify
the dam. You'll probably want to use the tool again()
to make the nodes at the corners of the pond into sharp corners:
- After that, just drag the swale back so it's touching the pond all the
way around the downhill side, and you're done. It should look something like
this:
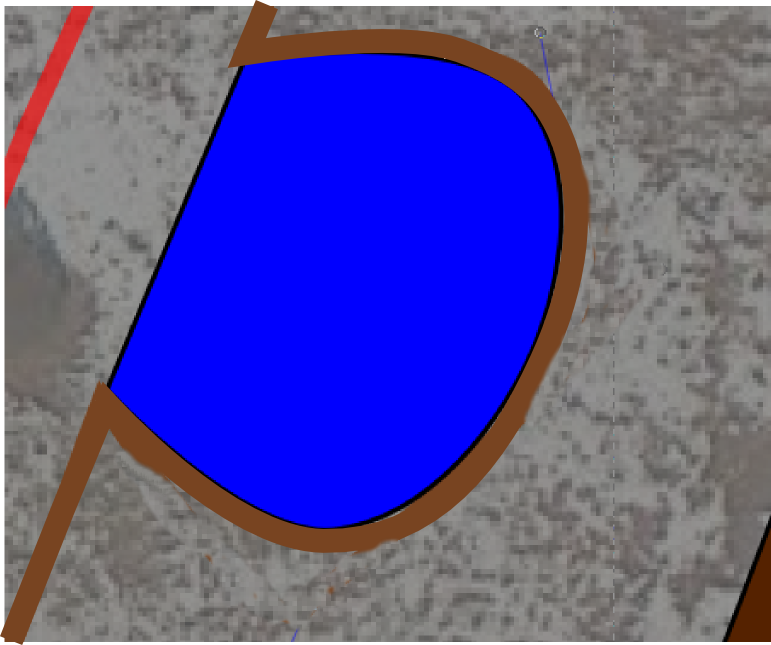
This is not a very realistic drawing of a dam because it doesn't give any indication of the size of the dam wall downhill from the pond (it should be quite a bit thicker on the downhill side). However, if you're doing a large design and have a lot of these to do, it's a quick way to get them done. The next version will have a much more realistic layout for cases where you need the extra detail in the design.
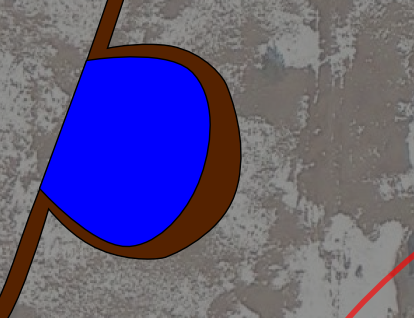
Drawing the pond on the outlined swale
- Select the pen tool
- Draw the outline of your pond, just as before
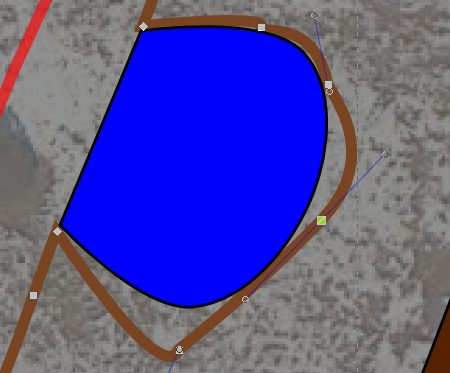
- Before you set the fill color, add a couple of extra nodes to the downhill
side of the swale berm (it'll be inside the pond at this point). Make sure to
add a point just outside of the pond on each side as well:
- Move the interior points so that they'll be outside of the pond, and then arrange them so that they represent where the dam will go and how thick it will be. Feel free to add more points as needed. Once again, the nodes at the corners of the pond should be sharp corners.
- Now, pick the pond again and set its fill color. Here's what you should end
up with, approximately:
You should now have all the tools you need to draw a complicated set of swales and ponds on your design! Next up we'll talk about roads (very similar to swales) and trees.
Drawing roads
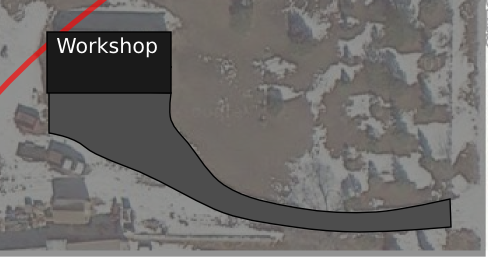
Road are very similar to swales, in that you can do them either with line thickness or by drawing the outline and fiddling with it to change the thickness. The only times you may want to do the outline approach are when your road is going to have wide spots for things like turnarounds, pullouts, parking spots, etc. You can use the exact same process we used for the swales here - just draw a simple one track road, then if you want to put a wide spot (for example, a place in front of a building to allow vehicles to back in to deposit cargo) all you have to do is add a few extra points and drag them around. (press n for node mode, then double click wherever you want more points).
Here's a quick example of a road for this site that seems plausible:
Freehand drawing, or how to draw decent-looking trees
Okay, the next big thing we're going to want is some way to draw plants without spending hours at it. Depending on your favorite style, there are a lot of options here. I'll give two of my favorites and you can work from there.
Freehand trees
First, the one I use most often is freehand sketching with the pencil tool
()
- Pick the pencil tool (F6 or )
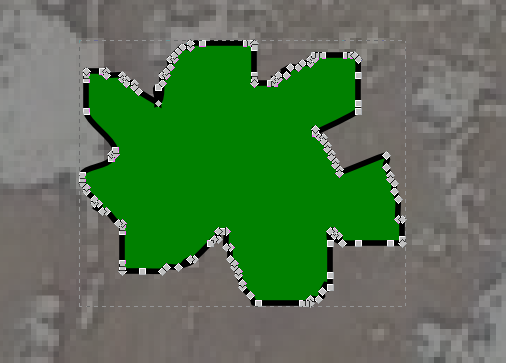
- Draw the shape you want for your tree. In this drawing, I use a jagged circle for evergreen trees and a smoother lumpy one for deciduous trees. To draw, just click and drag around like you would in paint.
- You'll notice that this process makes a LOT of points! If we left all of
those in there and copied this thing all around the drawing, we'd be sad because
it would bloat the size of the file by quite a bit. Not to mention, it's hard to
edit the shape will all of those points. So, we'll simplify it. Here's what it
looks like right after you sketch it:
- Press ctrl+l (that's lowercase 'L') to simplify the curve. Do this a few
times in succession until you get down to a more reasonable number of points -
each time it'll remove a few more, trying to do its best to preserve your shape
in the process.

- When you get your tree like you want it, it's time to start talking about replication. First, though, we'll take a look at the other way to make a tree...
"Official" trees
This is a style that's more reminiscent of architectural drawings. What we'll do
here is use the circle tool ( )
to get a base shape to work with, then we'll add a few embellishments to it.
)
to get a base shape to work with, then we'll add a few embellishments to it.
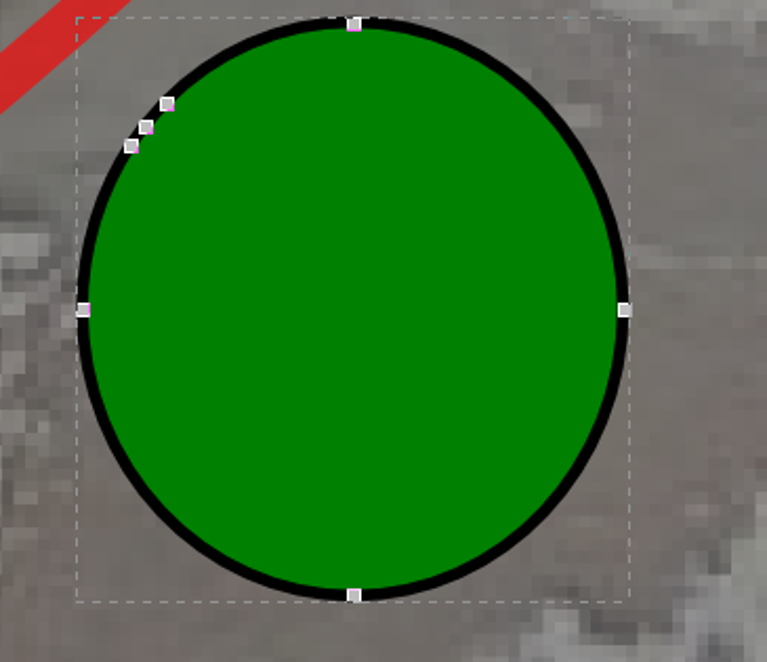
- Pick the circle tool (F5 or )
- Draw a circle by clicking and dragging until it's the size and shape you want.
- Convert the circle to a "path" (ctrl+shift+C or pick Path->Object to Path from the menu)
- Switch to node mode (press n)
- Double click the edge of the circle in three spots all close together to add
three new nodes. We're going to take the middle node and bring it in toward the
center a bit to give it a lumpy look, but not too lumpy... In the picture, the
three nodes I added are in the upper left part of the circle.
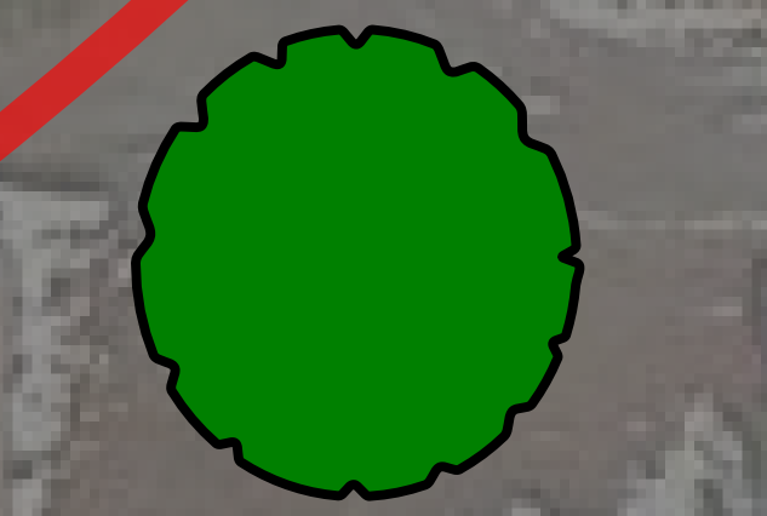
- Click the middle node of the ones you just added and drag it toward the center of the circle a short distance to get a little divot.
- Repeat steps 5 and 6 all around the circle until you have a decent-looking
tree:
Replicating (instancing) objects
There are some things that you'll copy a lot in these drawings, where it won't hurt if they're all basically identical. In inkscape, there are two basic ways to make this happen - copying and cloning.
When you copy an object, you create a whole new one in the drawing that has its own set of points and fill colors, etc. This is useful if you want to have another of something, but it needs to be slightly different in shape or color. To copy an object, just use the standard ctrl+c and ctrl+v (or whatever the equivalent copy and paste shortcuts are for you system).
When you clone an object, it's more like a reflection of the original. You can have 100 clones of a tree, for example, and if you change the original you'll end up with the exact same change in all of the copies. You should also get a somewhat smaller file size if you have lots of clones instead of lots of copies, so for some objects (particularly trees) I highly recommend cloning.
How to clone an object:
- Draw your parent object.
- Move the parent object to a special location, like a legend or something, so that you can find it again in the future. One downside of cloning is that it's hard to tell where the original object is after you put 1000 of them in, and you can only make modifications to the original. Therefore, make sure you put it in a special spot. If you're going to put a symbol key or legend on your map, this is an excellent place to store your master copies!
- Press Alt+d to clone the object. It will look like nothing happened, but if you click and drag the object you'll find that there's a new copy now!
- Do this as many times as you like, dragging the copies wherever you want them.
Wrapping up
We covered a lot of ground this time - you should have have most of what you need to get the basic drawing operations done. Next time we'll talk about using inkscape's shapes a bit more, and I'll start adding in some other software tips for doing research for your design (climate analogues, sun angles, precipitation, etc.). See you next time!